Upgrading Nice PayPal Downloads
Getting Started - Extension Install & Configuration
Getting Started - Setting Up Your First Item
Upgrading Nice PayPal Downloads
IMPORTANT: Starting with version 1.92 for Joomla 1.6 - 2.5 (filename: Joomla_1.6-2.5_pkg_nicepaypaldownloads_v1.92.zip), you no longer need to uninstall your previous version of the Nice PayPal Downloads extension before upgrading. Simply install the extension using Joomla's native installer and your installation of the extension will automatically be upgraded. As a precaution, you still need to make a backup of your site's files and database before upgrading. Other than backing up, no special steps are required to upgrade your site.
The only exception to this is if you are upgrading from Nice PayPal Downloads version 1.55 or earlier. In which case, you need a special database SQL update file, please contact us for more information.
Upgrading the Nice PayPal Downloads extension without data lose is relatively simple. Follow the instructions and you'll be finished before you know it.
1. Let's be safe, because everyone knows safety is fun. Make a back up of your site files and site database right now, before you move on to any other steps.
2. Download the latest version of the Nice PayPal Downloads extension. The ZIP file contains multiple installation packages. If your site is a Joomla 1.5 site then use the file with the prefix "j1.5-". Otherwise, use the file with a file name prefix of "j1.6-" for Joomla 1.6 sites. For upgrades, find the zip file with the file name suffix "-upgrade". For example if you are upgrading on a Joomla 1.5 site you would use the file named "j1.5-pkg_nicepaypaldownloads_vx.xx-upgrade.zip"
3. Login to the admin area of our Joomla site.
4. Go to Extensions>>install/uninstall>>components
5. Find and select "nicedownloads" and click uninstall. Don't worry, none of the Nice PayPal Downloads database information will be deleted*. Besides you made a backup, right?
*Please note, when updating from version 1.x the settings portion of the database will be overwritten. You will need to re-enter and save your Nice PayPal Downloads Settings information after the upgrade.
*Also important, when updating from version 1.x, if you are using the file folder found in joomla_root/administrator/components/com_nicepaypaldownloads/files you will need to re-upload your files and re-secure the file folder after the upgrade. Make sure to back-up your files before proceeding.
6. Go to Extensions>>install/uninstall>>plugins
7. Find and select "System - Nice Downloads Button" and click uninstall.
8. Go to Extensions>>install/uninstall
9. Click the “Choose File” button
10. Browse to the extension ZIP file, select it, click ok.
IMPORTANT: You MUST select the ZIP file named "ext_nicepaypaldownloads_v1.xx-upgrade_1.x_to_1.x.zip". If you select the other ZIP file your Nice PayPal Downloads database information will be permanently erased.
11. Click “Upload & Install”
12. Navigate to Extensions>>Plugin Manager>>System - Nice Downloads Button
13. Click Enable "Yes"
14. You're done! See it was painless.
Getting Started
Basic Extension Install & Configuration
*If you don't already have one, sign up for a business PayPal account.
*Unzip ext_nicepaypaldownloads_v1.xx-unzip_1st.zip before continuing. Use the ZIP package named ext_nicepaypaldownloads_v1.xx.zip for new installations.
1. Install the extension using the standard Joomla installation method.
1. Go to Admin>>Extensions>>Install/Uninstall
2. Click the “Choose File” button
3. Browse to the extension ZIP file, select it, click ok.
4. Click “Upload & Install”

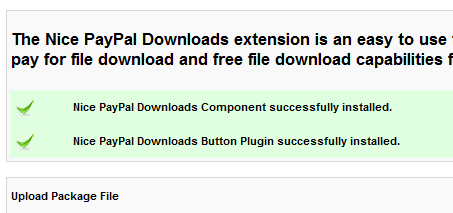
When Joomla is finished installing the extension package, there will be two new extension available in your Joomla system, the Nice PayPal Downloads component and the Nice Downloads Button plugin. Both are necessary for the Nice PayPal Downloads system to operate successfully.
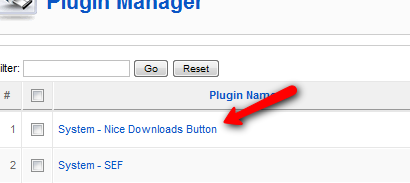
3. Navigate to Admin>>Extensions>>Plugin Manager>>System – Nice Downloads Button
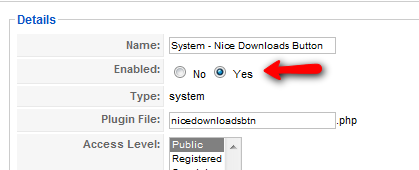
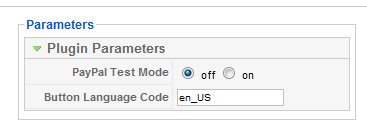
4. On the Nice Downloads Button plugin page, click the enable radio button, this will turn the plugin on.
Additionally, you can put the Nice PayPal Downloads system in test mode by clicking the on/off radio buttons in the plugin parameters. A PayPal sandbox account (see http://developer.paypal.com for more information) is required to operate in test mode correctly. The plugin parameters is also where you can specify the language to be used for the default PayPal button graphics. Click “Save” when you're ready. We are finished with setting up the button plugin.
Now, on to the Nice PayPal Download component.
5. Go to Admin>>Components>>Nice PayPal Downloads.
During the install, a demo item and settings where configured for your reference. The demo item can be altered or deleted if you desire. However, it is recommended that you leave the demo in place until you are more familiar with the Nice PayPal Download extension.
You will see a submenu with five subsections under the Nice PayPal Download view, labeled Nice Downloads, File Manager, Download Profiles, Transactions and Settings.
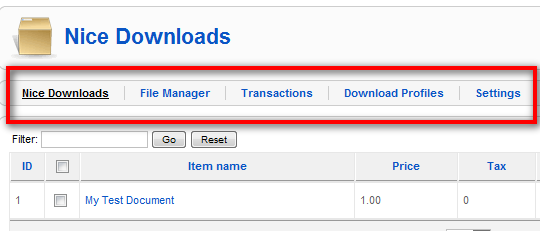
6. Click on Settings first. The settings section is where all global settings, meaning settings that apply to all downloads managed by the Nice PayPal Downloads component, are accessed and set. Most of the settings have been set with a default value and don't need to be configured yet. Enter your PayPal account email address into the corresponding field and click save.
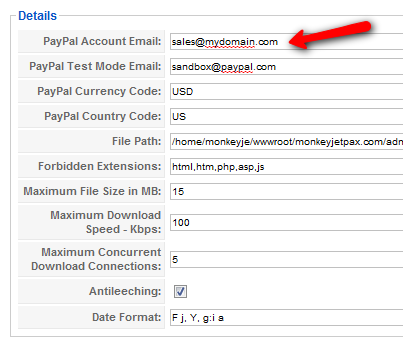
Your PayPal Account Settings
Your PayPal Account will also need a few quick changes in order to ensure that it is set up properly to handle IPN communications with the Nice PayPal Downloads extension.
7. Navigate to PayPal and login to your account
8. Go to Profile>>More Options>>My Selling Tools
9. Find "Instant Payment Notification" below the subtitle "Getting paid and managing my risk" and click the "update" link to the right.
10. Enter the Notification URL for the Nice PayPal Downloads extension. The URL is as follows (replace “mydomain.com” with your website's domain name)
Before Nice PayPal Downloads version 1.65 enter:
http://mydomain.com/index.php?option=com_nicedownloads&controller=Ipn&task=ipn
After Nice PayPal Downloads version 1.65 enter:
http://mydomain.com/index.php?option=com_nicepaypaldownloads&controller=Ipn&task=ipn
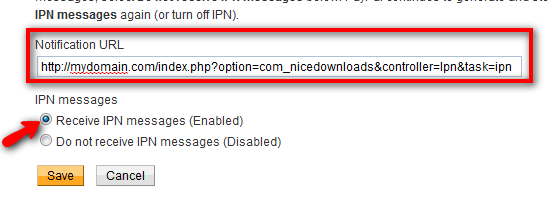
11. Tick the radio button labeled Receive IPN Notification and click Save.
Setting Up Auto Return on PayPal
Optionally, you may like to have your buyers automatically returned to the Nice PayPal Downloads return message page on your site. To do this simply follow the next few sub-steps below.
A. Login to PayPal
B. Go to My Account>>Profile>>More Options>>Website Payment Preferences
C. Select the Auto Return "on" radio button.
D. Enter your domain (http://www.yourdomain.com) in the Return URL field. This is a default, the Nice PayPal Downloads will send an override URL that returns the buyer to the NPD's return message page.
E. Click the save button at the bottom of the page.
If you don't set up auto return the buyer will be presented with a button on the PayPal site that, when clicked, returns them to your site.
Setting Up The Payment Button
Alright we are done with the settings in PayPal. Let's return to the Nice PayPal Downloads component and set up our first item button.
12. Notice, on the Nice Downloads subpage that the demo item has an id number. This number is what we use to tell the Nice Downloads Button plugin what information to use when building the PayPal button. So, if the item is $17.95 the Nice Downloads Button plugin will create a PayPal Buy Now button for $17.95. Likewise, if the item is set to be free ($0). The Nice Downloads Button plugin will create a download button instead of a PayPal button. The plugin is very intuitive in this respect.
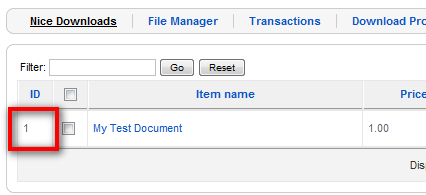
13. Go to the Article Manager and create a new article. Type in the following Nice Downloads Button tag:
{nicedownloads:1}
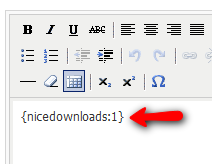
Notice that we have entered the number “1”. This number refers to the item id number listed on the Nice Downloads item page. The information for that item will be used when the button is created on the frontend.
14. Click the save article button
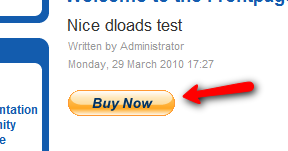
15. Time to checkout our handy work. Go around to the frontend and take a look at the article we just created. You should see a PayPal “Buy Now” button where the Nice Downloads button tag was placed.
Setting Up Your First Item
Every download item that you wish to sell using the Nice PayPal Downloads extension requires four things, an item record, a file, a download profile and a button on the front end. The Nice Downloads has been design to facilitate the maximum amount of flexibility, while retaining an intuitive interface. This ensures that listing items is straight forward and easy to learn.
Adding Files to the File Manager
Let's start with the file you want to distribute. In the submenu click "File Manager". The file manager displays a list of all files that are available, for distribution, to the Nice PayPal Downloads extension. There are two main ways to add new files to this list. The first is to upload a file through the admin interface using Joomla's FTP layer. Let's start with this method.
1. Depending on your Joomla configuration, you may be prompted for FTP credentials. If this is the case go ahead and supply this information now.
2. Click "Choose File", browse to your desired file on your local system and click up "Ok".
3. Click the "Upload" button.
4. Depending on the size of your file, it should appear in the File Manger's list in a few moments.
5. Review the file list in the File Manager to see that the files are now listed.
The second method is to directly FTP the file to your site using a FTP client, such as Filezilla. This method is desirable if:
- you are not using the Joomla FTP layer
- you want to perform a bulk file upload
- you want to store your uploaded files in subfolders
- you are storing your uploaded files in a secure location not accessible by Joomla's FTP layer
1. Click on "Settings" in the Nice PayPal Downloads's submenu. Find the field entry labeled "File Path". This will give you the location of the file storage directory. You will upload your files to this directory.
2. Open your FTP client and login to your site.
3. In your FTP client, navigate to the file directory.
4. Upload your file(s)
5. Check the File Manager to see that the files are now listed.
Download Profiles
A download profile defines messaging and download access limits for each item that is distributed using the Nice PayPal Downloads extension. The same download profile may be used for multiple items or you may choose to create different profiles for individual items. This is entirely up to you and your needs. This method of defining profiles was established in order to achieve greater flexibility for individual needs, while retaining a system in which one can rapidly list new items for distribution.
Take a few minutes and review the default profile that was automatically created during the installation.
Nice Downloads - Items
The Nice Downloads subpage is where it all comes together. The items listed here are the records of files ready for distribution. Let's create a new item now.
1. If you are not currently on the Nice Downloads subpage, click on the submenu link labeled Nice Downloads
2. Click the New button to begin creating a new listing.
3. Enter a meaningful name for the item.
4. Enter the price and tax for your item. If the item is to be distributed as a free download leave the price and tax fields blank or enter 0.
5. The File field is a list of all of the files that are stored in the File Manager. Select the file that you want to distribute or make available for download.
6. Select a Download Profile. Free downloads do not depend on Download Profiles as heavily as paid for downloads. However you should select a profile for free items as well. As a side note, in the Nice Downloads list view the "PID" column indicates the Download Profile used for the particular item.
7. Hits is a simple counter that records the number of times an item has been downloaded. This field can be left alone, unless you wish to reset it to 0 (or to any other number for that matter ).
8. Click Save.
Placing a Download Button
We have already gone over placing a button a bit earlier. However, it is important to understand that the Nice PayPal Downloads extension does not work like traditional download extension. The items for download are not automatically listed to visitor is a pre-designed list or anything of that nature. In order to maintain maximum flexibility for the administrator, a Nice Download Button tag must be place in an article or custom module or something of that nature.
Follow the instructions for placing a button tag that are found earlier in this article.
Now, there are a few variations for the button tag that make its usage even more flexible. By default the Nice Downloads Button uses the "Buy Now" button. You can also specify it, even though it is not necessary by using a tag like this:
{nicedownloads:1|buy}
This is an important distinction in the tag syntax, becuase it allows you to specify PayPal's "Pay Now" button graphic, like this:
{nicedownloads:1|Pay}
and to set custom graphics for use as the button graphic, like this:
{nicedownloads:1|http://yourdomain.com/images/yourcustombutton.jpg}
Securing Your Files
By default the all downloadable files are stored in a predefined directory that was set up at install. Check the settings page for its exact location (Joomla Admin Area>>Nice PayPal Downloads>>Settings).
In order to ensure that your files are securely stored, it is recommended that you do one of the following:
- For Linux servers, use an .htaccess file to password protect the file folder
- Move the file folder location above the domain_root folder.
- If the above options are not possible, move the file folder to a new location within the domain_root (this solution is the least secure)
Option 1 - .htaccess Solution
An .htaccess solution is perhaps the most flexible and very secure. This solution is only applicable for those whose sites are running on a Linux server. This solution is also easily implemented.
1. You will need to create a file named "htaccess.txt" on your local computer.
2. Open the new htaccess file in a simple text editor, like MS Notepad.
3. Enter the following line of code
deny from all
4. Save your changes to the file.
5. Upload the htaccess.txt file to the Nice PayPal Downloads file folder. You will find this folder at joomla_directory/administrator/components/com_nicepaypaldownloads/files
6. Once uploaded you need to change the name of the remote htaccess.txt file to .htaccess
Now, when you try to access the file folder through your browser you will be presented with an access denied message.
Option 2 - Moving the File Folder Above Domain_Root
The most secure place to store the file folder is above the publicly accessible domain_root folder.
Example Server Paths
Inside the domain_root
/home/hostusername/domainname/wwwroot/web_accessible
Above/Outside of the domain_root
/home/hostusername/secure_folder
Keep in mind the above server path examples will vary from server to server.
Of course, if you do set the file directory out of the public's reach, you will sacrifice the ease of use that the Joomla FTP layer provides. Where ever you decide to move the file directory to, make sure that you accurately enter the new file path into the settings page and click save. Go to Joomla Admin Area>>Nice PayPal Downloads>>Settings and enter the new file folder path in the appropriate field and click save.
Option 3 - Moving the File Folder Inside the Domain_Root
This is the least secure solution. If you have decided to use this solution bare in mind that anyone with knowledge of the file folder will be able to access and download your files through a web browser, bypassing the Nice PayPal Downloads extension.
To use option 3 simply create a new file folder in your domain_root and then change the file folder settings in the Nice PayPal Downloads settings. Go to Joomla Admin Area>>Nice PayPal Downloads>>Settings and enter the new file folder path in the appropriate field and click save.
---
An important side note, a newly created file directory will need to have its permissions set to 755. Unless you are not using the Joomla FTP layer and still wish to upload through the admin interface. In this case the directory will need a permission setting of 777 (a permission setting on a directory of 777 is in most cases frowned on as a security risk).
Download Profiles
Download profiles govern buyer messaging and other attributes related to the downloadable items. The profiles have been designed in such a way as to allow for using a single profile for multiple downloadable items. Or, new individual profiles can be created and set for each individual downloadable item. This design provides maximum flexibility to the administrator for a wide variety of file distribution requirements.
Downloadable files are primarily geared towards pay-for downloads, as much of their attributes are related to the way in which the Nice PayPal Downloads extension interacts with a buyer. Free downloads bypass much of a profiles settings, as these settings are not needed to govern the messaging and downloading of free files. This said, the extension still expects a download profile to be designated for free downloads.
Download Profiles Section
When on the Download Profiles list page you will see a list of all available download profiles. You can sort the list of profiles by clicking the various column labels. You are also able to filter the list by profile name. To filter the list simply enter a keyword in the filter box and click the go button.
On the Download Profiles list page, you can create new profiles by clicking the new button. Or edit existing profiles by either clicking the profile name or marking the checkbox next to the profile and clicking the edit button. In addition, you can delete profiles by clicking the checkbox next to the profile you wish to delete and then clicking the delete button.
As an important side note, the Download Profile ID (see ID column) corresponds to the PID number column found in the Nice Downloads Items page. When reviewing items listings in the Nice Downloads Items page you can quickly reference which profile is associated with the item by looking at the PID column.
Download Profile Details
You will enter the Download Profile Details page when editing or creating new profiles. On this page you will find a number of fields for setting download attributes and messaging. As a side note, all message body fields support HTML. The list of parameters is as follows.
- Profile Name – Defines the name that appears in the Downloads Profile list
- Time Limit in Minutes – Defines how many minutes after the first time the buyer downloads the file, is he allowed to download consecutive copies of the file. For example you could enter 120 for 2 hours, or 43200 to allow a 30 day time span until download page expiration. Enter a zero value for an unlimited time span.
- Number of Downloads Allowed – Defines the number of times the buyer is allowed to download the file until the download page expires. Enter a zero value for unlimited downloads.
- Download Button Custom Graphic URL – To use a custom download button graphic on the download page enter the full web URL to the graphic in this field.
- Return Message – The success message the buyer sees when returning to your site from the checkout process on the PayPal website.
- Cancellation Message – The cancellation message the buyer sees when returning to your site after canceling the checkout process on the PayPal website.
- Download Message – The message the buyer sees when they visit the download page for the item they purchased, after their payment has been marked as 'Completed' by PayPal.
- Payment Status Message – The message the buyer sees when visiting the Payment Status page. The buyer is redirected to this page if they visit the download page for the item they purchased, and the payment status is not marked as 'Completed'.
- From Email Address – Your email address that you wish to use when the system sends emails to the buyer.
- Email Success Subject – The email subject line to be used when the payment success (with download link) email is automatically sent to the buyer.
- Email Success Message - The email message to be used when the payment success (with download link) email is automatically sent to the buyer.
- Email Fail Subject - The email subject line to be used when the payment failed email is automatically sent to the buyer.
- Email Fail Message - The email message to be used when the payment failed email is automatically sent to the buyer.
- Expired Message - The message the buyer sees when visiting the Expiration page. The buyer is redirected to this page if they try to visit the Download page and have exceeded their download limits. This is in reference to either the minutes time limit or the number of times they are allowed to download the file, which ever comes first.
Replacement Tags in Message Text
When creating message text you will be able to use substitution tags, that will be replaced with relevant information from the database, when the message is rendered for the the buyer to read. These tags are as follows.
- %firstname%
- %lastname%
- %itemname%
- %itemnumber%
- %transactionid%
- %paymentstatus%
- %downloadcount%
- %downloadsallowed%
- %firstdate%
- %timeallowed%
- %downloaduntil%
- %downloadlink%
The tags are replaced with the following information.
- %firstname% - replaced with the buyer's first name
- %lastname% - replaced with the buyer's last name
- %itemname% - replaced with the name of the item the buyer purchased
- %itemnumber% - replaced with the ID number of the item the buyer purchased
- %transactionid% - replaced with the PayPal transaction ID for the purchase
- %paymentstatus% - replaced with the current PayPal payment status (Pending, Completed, Refunded, etc.)
- %downloadcount% - replaced with the number of times the buyer has downloaded the file
- %downloadsallowed% - replaced with the number of times the buyer is allowed to download the file, as set in the download profile.
- %firstdate% - replaced with the first date the buyer downloaded the file
- %timeallowed% - replaced with the amount of time the buyer is allowed to download the file
- %downloaduntil% - replaced with a countdown time value reflecting the amount of time before the buyer is no longer allowed to download the file
- %downloadlink% - replaced with the link to the page where the buyer can download the file the purchased.
Keep in mind that not all the tags will have suitable information to use for replacement for all messages. The return message and cancellation message will not have any tag information available to them, as PayPal has not sent the data to the extension yet. Also, the %downloadlink% tag is only available to email messages. This is due to the fact that it is the only place that putting the download link in a message makes sense.
VERY IMPORTANT: You MUST include the %downloadlink% tag in the “Email Success Message” or the buyer will not receive the download URL in the automatic email notification the extension sends to them. Thus, they will not be able to get to the download page to retrieve the file.
A quick note about the download link, if the buyer does visit the download page through the link that is provided by the download link tag, and the payment is not Completed (meaning pending, refunded, canceled, etc.), the buyer will be redirected to either the status page or the expiration page.
IPN Message Log
The IPN Message Log was added in version 1.50. It was designed to give administrators a tool for investigating IPN messages during set-up and testing of the extension. When enabled the IPN Log records all incoming IPN messages from PayPal to the extension. It also records whether a IPN message was accepted or rejected. In the details view the log lists the reasons why a message was accepted or rejected. This has proven to be a very useful tool and we are happy to be able to offer it.
The operation of the IPN log is very straight forward. By default the log is turned off at install. To enable it simply go to Admin>>Nice PayPal Downloads>>Settings, click the IPN Log check box. Then save your settings. From this point forward the all IPN messages will be recorded in the database.
*Please note that the IPN Log is intended to be a diagnostics tool. Therefore, it is recommended that this feature be disabled during normal operations of the site.
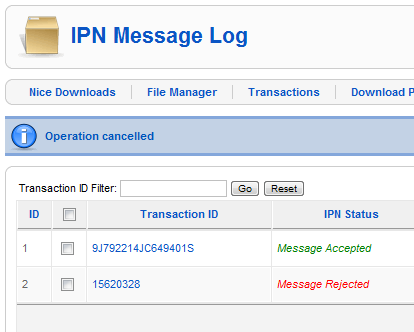
To view the details of a given IPN message simply click the Transaction ID of any given message in the list.
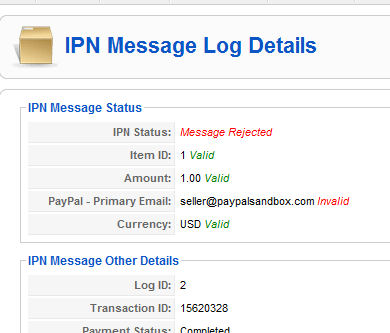
The image above shows the details view for an IPN message that was rejected by the extension as fraudulent. This happend because there was a mismatch between the seller's PayPal primary email address set in the extension settings and the one sent in the IPN message from PayPal. Thus, the transaction information was not recorded in the Transaction area of the extension and the IPN message was ignored. With the addition of the new IPN Log administrators can quickly and easily review such matters and take appropriate action where need be.
