Plugin Installation and Set Up
1.If you don't already have one, sign up for a Authorize.Net account.
2.Install the Nice Authorize.Net plugin using Joomla's extension Manager.
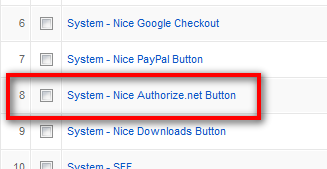
3.Go to Extensions>>Plugin Manager and click into the plugin “System – Nice Authorize.Net Button.”
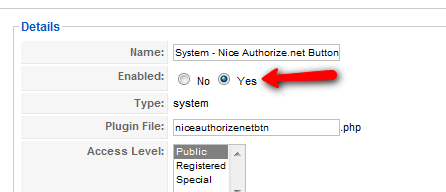
4.Enable the plugin.
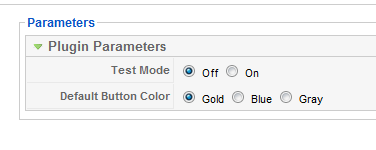
5.Optionally, set the default parameters to your desired specifications.
6.Click the Save button.
Adding a Button Listing
1.Login to your Authorize.Net account
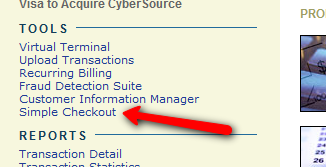
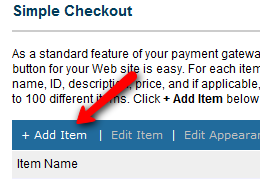
2.Go to Tools>>Simple Checkout
3.Click “+ Add Item.”
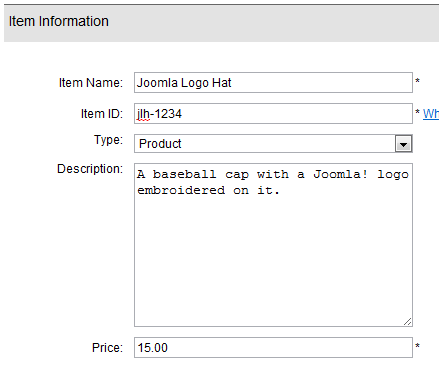
4.Fill out the Item Information form.
5.Click the Save button at the bottom of the page.
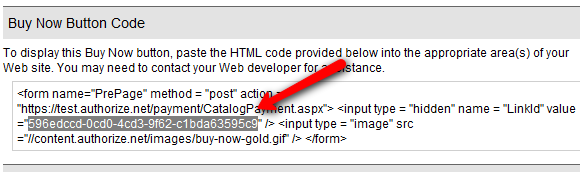
6.On the proceeding page you will see the Button Code.
7.Find the Linkid value, it will look like a long string of letters and numbers, select and copy the Linkid.
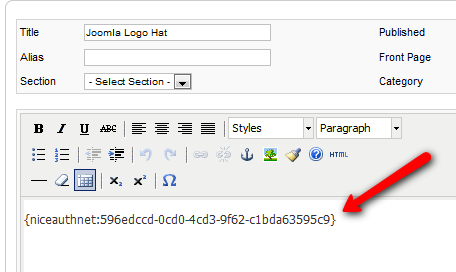
8.Log in to your Joomla site's admin area and create a new article in Joomla using the Article Manager.
9.In the Joomla Article Editor type the button tag: {niceauthnet:PASTE LINKID HERE}. When you are finished you should have something that looks like this: {niceauthnet:596edccd-0cd0-4cd3-9f62-c1bda63595c9}
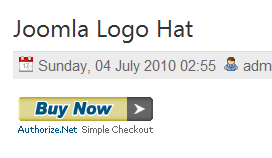
10.Save your article and go view it from the front-end of the site. You will see a button were your button tag used to be!
Button Graphic Variations
There are three color variations for the default Authorize.Net button graphic, gold, blue and gray. The default color can be specified in the plugin's parameters by going to Extensions>>Plugin Manager>>System – Nice Authorize.Net Button. By default the Authorize.Net “Buy Now” button graphic is used. However, you may specify any one of the following three in your button code.
- Buy Now
- Donate
- Custom graphic
The tag syntax with the button graphic setting is as follows.
{niceauthnet: Linkid|graphic option}
As mentioned, the “Buy Now” button graphic is the default and does not need to be specified. However, if you wish to specify it anyway you would do so like this.
Buy Now Example
{niceauthnet: 596edccd-0cd0-4cd3-9f62-c1bda63595c9}
Or
{niceauthnet: 596edccd-0cd0-4cd3-9f62-c1bda63595c9|buy}
Use the Authorize.Net “Donate” button set your tag up like so.
Donate Example
{niceauthnet: 596edccd-0cd0-4cd3-9f62-c1bda63595c9|donate}
And last, but most exciting, to use a custom graphic for your button set the tag up with a full URL in the “graphic option” field. See the example below (replace the example URL with one that points to your graphic).
Custom Graphic Example
{niceauthnet: 596edccd-0cd0-4cd3-9f62-c1bda63595c9|http://www.mydomain.com/images/mybuttongraphic.jpg}